Your Cart is Empty


Introduction to Music Composition When it comes to music, there are two fundamental components that make it what it is: rhythm and melody. However, I strongly believe that tones and textures are often neglected, and that is why I am passionate about dedicating ample time to discovering the perfect sounds. - Flume
utilized by Flume for his sound design, employing powerful digital synthesizers that offer the versatility of unison and voice detune settings, as well as captivating wavetable oscillators. Notably, there are several exceptional digital synths favored by Flume for his artistic expression. Native Instruments Massive, XFer Serumand there are many alternatives available aside from Lennar Digital Sylenth1. Flume has probably used Sylenth1 for creating the majority of his sounds, as he mentioned, "I have an in-depth knowledge of Sylenth1, so I can create any sound with it... it’s the synthesizer I am most familiar with."
The majority of the sounds in Flume's repertoire are quite basic in their essence, but their uniqueness usually comes from extensive post-processing with effects and being fragmented after being bounced to audio. Let me briefly explain some synth sounds used by Flume and how you can recreate them. Let's start with a timeless Supersaw patch, prominently heard in the track "Holding On". As the name implies, it consists of numerous sawtooth waves with a generous amount of unison and voice detuning for an immensely expansive sound. For this, I utilized Sylenth1 with four oscillators, two of which are set to Saw, one set to Saw an octave higher, and a fourth oscillator set to produce Noise. The three Saw oscillators are each set to eight voices with detuning to achieve a thick and rich sound.

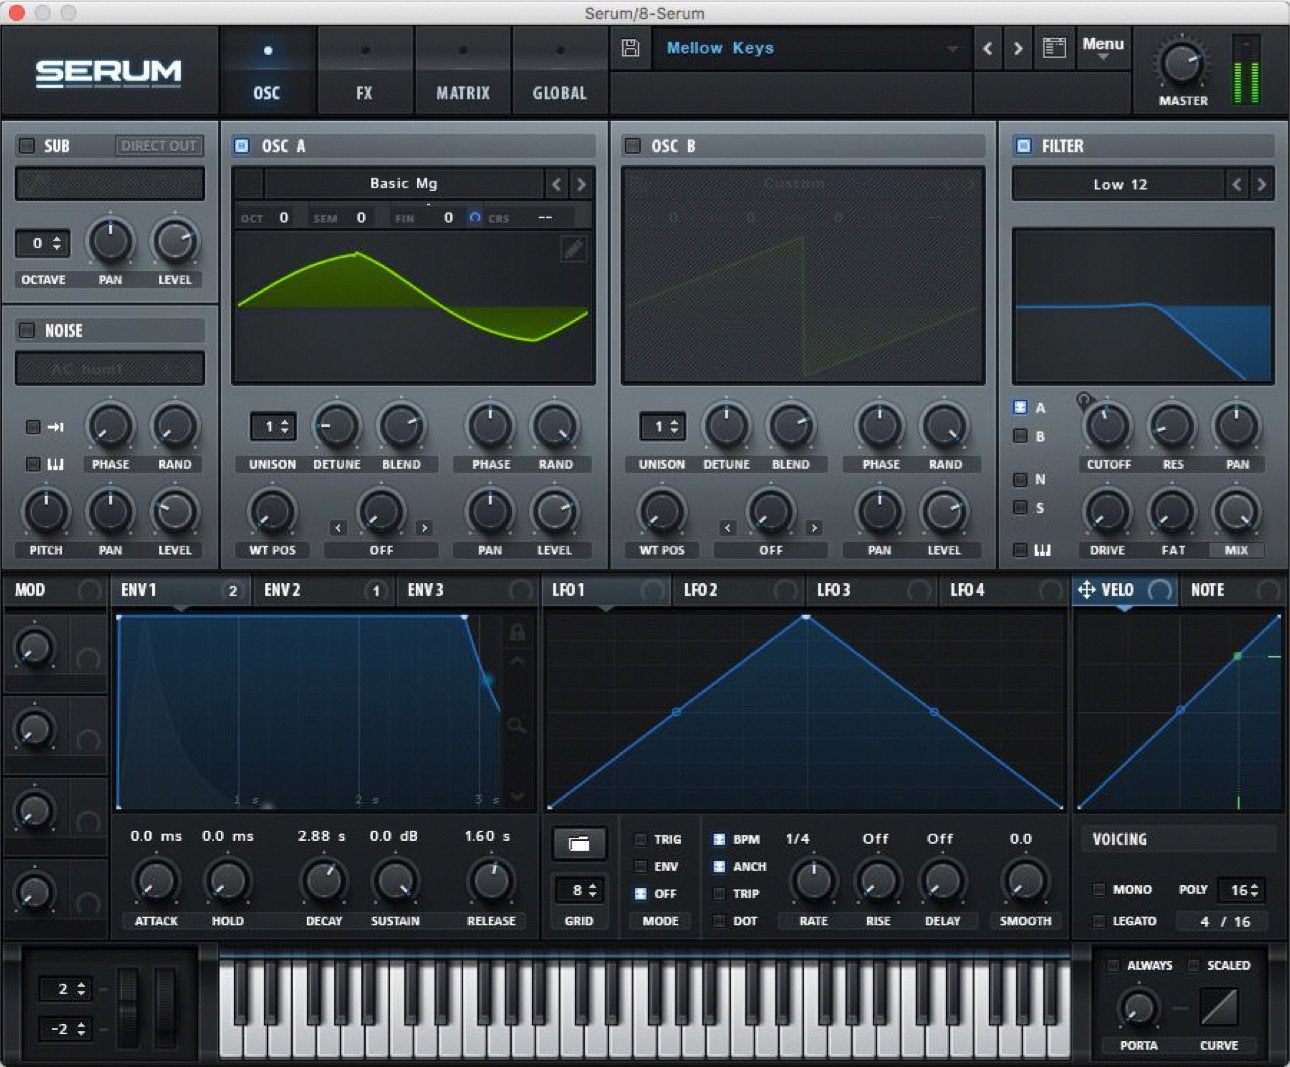
One more amazing patch you can try is the Mellow Keys sound that can be heard at the start of Holding On. To achieve this, you'll need a simple sine wave passing through a filter with a mellow character. I personally prefer using Xfer Serum with the 'Basic Mg' waveform and the 'Low 12' filter. Once you have this set up, you can introduce some pitch modulation to create an intriguing effect. While you can employ an LFO for this purpose, I opt to utilize another envelope that slightly detunes the pitch whenever I play a chord.
To achieve a Drifting Keys sound reminiscent of that from Sintra, begin by employing a simple sine wave routed through a filter. However, this time around, introduce the element of a slowly progressing Low-Frequency Oscillator (LFO) to modulate the pitch. Remember to keep the modulation subtle, as excessive manipulation will result in an off-key resonance within your sound design!

Serum's wavetable functionality can also be employed for the effortless synthesis of peculiar leads. I opted for the 4088 wavetable to craft a captivating, vibrant lead that bears resemblance to the conclusion of Holding On.

On Insane track, we present a rather uncomplicated Portalead sound, named after its characteristic use of extended Portamento for smooth note transitions. To recreate this sound, launch Serum and modify the default patch by adding a slight detune to the sawtooth wave using the unison feature. Set the synthesizer to mono/legato mode and increase the glide time to approximately 550ms.

One more clever technique that often arises is the utilization of an One more smart tactic that frequently emerges is employing an. arpeggiatorOne way to achieve rapid arpeggio runs is by turning off the Repeat function on your arpeggiator. Flume often uses this technique to create a quick arpeggio effect rather than a continuous one. In your song, play the chords manually while the Repeat function is turned off. You can hear Flume use this technique in his songs "Sleepless" and "Holding On". For some innovative arpeggiator usage, check out the track "Helix" from his 2016 album "Skin". Flume's tracks typically don't have heavy bass, so I recommend using a simple sub-bass patch to fill in the low-end. I like to use Serum's Sub Oscillator with a square wave to create a growling bass sound. However, if you prefer a more subtle and mellow sub-bass, you can try using a sine wave instead of a square.

Flume's music doesn't rely heavily on bass, so I've decided to stick with a basic sub-bass patch to enhance the lower frequencies. To achieve a growling bass sound, I've opted for Serum's Sub Oscillator with a square wave. Alternatively, for a softer and more mellow sub-bass, you could try using a sine wave instead of a square. Flume's tracks aren't too bass heavy, so I'm sticking with a simple sub-bass patch to fill up the low-end. I'm using Serum's Sub Oscillator with the square wave to create a growling bass to fill the low-end. For a more subtle, mellow sub-bass you could use a sine wave instead of a square.

Flume draws inspiration from classic pop music when crafting his songs, employing repetitive chord progressions that undergo subtle alterations to maintain a sense of novelty. Additionally, he incorporates intriguing harmonic choices, including the use of seventh chords and inversions. In his track "Holding On," he employs a recurring sequence of Fm - Abmaj7 - Cm - Bb chords, which bears resemblance to the chord progressions found in Daft Punk's hit songs "Lose Yourself to Dance" and "Get Lucky".
To embark on composing our unique piece, we can incorporate a widely utilized pop chord sequence, famously known as the I – V – vi – IV progression. In the key of C, this progression translates to C - G - Am- F.

This is an alright sound, but personally, I find it somewhat unexciting; we can enhance it by modifying a few notes. I've included some additional notes above the chords to transform the C into a Cmaj7 and the G into a Gsus2. Additionally, we can mix up the progression by commencing halfway through the Am chord, resulting in the following:

And here it is accompanied by a simple rhythm underneath: And here it is accompanied by a basic beat:
Flume's music is packed with innovative production techniques that ensure its uniqueness. Not only does he employ advanced methods such as modifying vocal samples through pitch bending and portamento, but he also incorporates simpler techniques to achieve an exceptional sound for his mixes.
Sidechain compressionSidechain compression is an essential tool in the world of electronica. It is often associated with the extreme pumping effect found in songs by artists like Daft Punk and deadmau5. However, this technique can also be utilized in a more subtle manner. By applying sidechain compression, the drums can be given more space, allowing the beat to stand out in the mix.
instance, but the basic concept remains the same. By utilizing sidechain compression, a specific track can be automatically attenuated in volume whenever a designated trigger track is activated, typically drums. This results in a rhythmic pulsating effect that adds depth and excitement to electronic dance music with a four-on-the-floor beat. Although the implementation may vary, the fundamental principle of sidechain compression remains constant. DAWHowever, during my performances, I utilize the Glue Compressor plugin in Live to dynamically decrease the volume of the chord progression in synchronization with the beat. Take a listen to the audio sample provided and observe how the drums can cleanly break through the mix of synth tracks.

Flume's unique sound is characterized by the manipulation of various sounds, particularly those of vocals. There are several options to incorporate vocals into your own music: you can either record your own vocals, collaborate with a guest vocalist, or explore sample packs for high-quality vocal samples. Flume himself often relies on sample packs and emphasizes his discerning selection process. samples for his productions:
Additionally, I frequently acquire numerous sample packs in order to enrich my collection. Consequently, I painstakingly sift through an extensive assortment of kick drums and snare drums, meticulously searching for the perfect sound. My discerning taste demands each sound to possess an unparalleled quality, as I have no desire to utilize ordinary, commonplace sounds. On the contrary, I am driven to uncover peculiar and outlandish audio samples.
- Flume
This is the demo of my track without any edits. I have adjusted the pitch to match the key of my song, specifically lowering it by 2 semitones to C Major. The result is satisfactory, although it does not seamlessly blend with my track, especially towards the end of the sample.

To enhance the compatibility of the sample with your track, utilize the cutting, pasting, duplicating, and moving features of your DAW. Additionally, you can infuse rhythm into the sound by reversing specific sections, which adds a touch of surrealism. For a more in-depth exploration of this technique, I recommend experimenting with repitching your samples and applying them to a keyboard to utilize pitch bend and portamento. Take a listen to my modified rendition, where I particularly enjoy duplicating small segments to create a captivating stuttering effect.

Be sure to dig through some sample packsTo discover unique and captivating examples, it is not required for them to resemble the one I utilized. The manner in which you employ the example will ultimately shape your distinct sound.
Click on the provided hyperlink to access and download the Serum presets that were utilized for the audio. Also, make sure to check out the link below for downloading the Serum presets used in the audio. Apply the code FREE100 when you proceed to checkout in order to obtain the project files without any charge. Benefit from a 100% discount with this excellent offer. Don't miss out on this opportunity to acquire the project files for free! Thank you for taking the time to read this and please keep in mind the importance of delving deeper into these concepts and incorporating them into your own musical creations, regardless of the genre you specialize in. Numerous techniques and sounds have the potential to transcend multiple genres, and by exploring ideas from different genres, you can achieve remarkable outcomes.
Some time ago, we published a tutorial on Flume music production for those who were interested. However, we inadvertently omitted the project files for you to follow along. Make sure to download the following pack using the code below for a 100% discount and follow the step-by-step Flume production tutorial provided below.
100% Off Code: FREE100
Tutorial Steps:
Flume Music Production and Sound Design Tutorial
Learn the secrets of music production and sound design with Flume.
In this tutorial, Flume will guide you through the process of creating your own unique music and sound. Whether you're an aspiring producer or a seasoned pro, Flume's expertise will help you take your skills to the next level.
Discover how Flume develops his signature sound, and learn the techniques he uses to produce chart-topping tracks. From designing synths to crafting intricate drum beats, this tutorial covers everything you need to know about Flume's music production process.
Join Flume as he dives into the world of sound design, showing you how to create innovative textures and captivating atmospheres. Explore different audio manipulation techniques and find inspiration in Flume's creative workflow.
With this tutorial, you'll gain a deeper understanding of music production and sound design, unlocking new possibilities for your own projects. Get ready to elevate your sound and create music that truly stands out.
Tutorial Contents: